

Beginner’s Guide to Hostinger hPanel (2026 Edition)
August 2, 2026 | by anisurrahaman235f@gmail.com
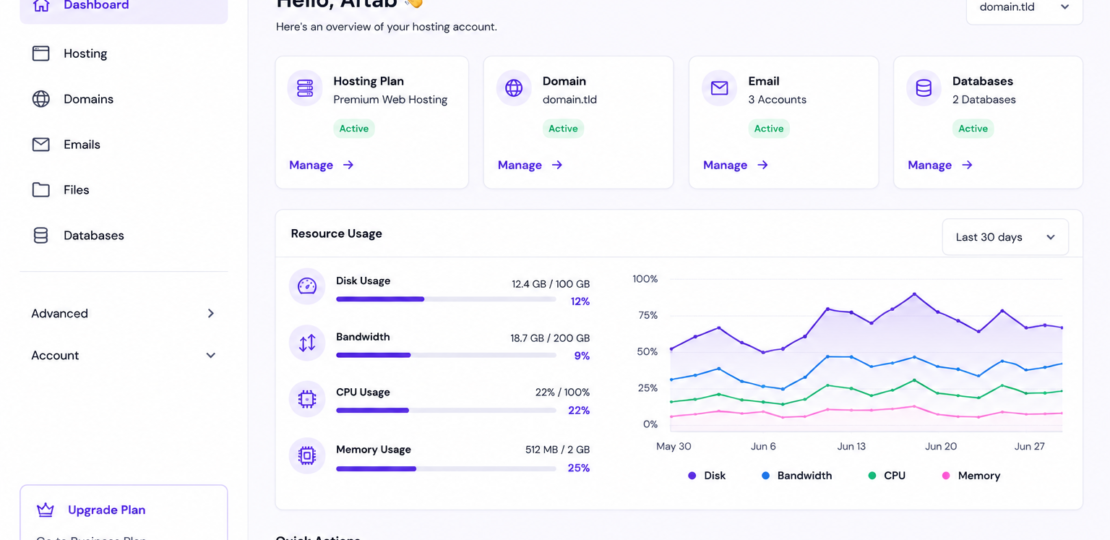
If you’ve just signed up for Hostinger and logged in for the first time, you’ve probably noticed something: it doesn’t look like the control panel you may have seen on other hosting tutorials. That’s because Hostinger doesn’t use cPanel, the decades-old industry-standard dashboard most hosting companies still rely on. Instead, it built its own interface from scratch, called hPanel. This guide walks through exactly what hPanel is, how it’s organized, and how to actually use it as a complete beginner in 2026, including the newer AI-driven tools that have become a core part of the dashboard over the past year.
What Is hPanel, Exactly?
hPanel is Hostinger’s custom-built, in-house control panel, designed to replace the older cPanel interface that has dominated web hosting for years. Rather than trying to cram every possible server setting onto one screen, hPanel was built around a simpler idea: show beginners the tools they’ll actually use, when they need them, without burying important features under layers of technical menus. It comes included with every Hostinger hosting plan except VPS, which uses a slightly different set of server-management tools due to the nature of virtual private servers.
The philosophy shift matters more than it might sound. cPanel was originally designed for server administrators managing client accounts, so it exposes an enormous number of settings by default. hPanel instead assumes most of its users are small business owners, bloggers, and freelancers who just want their website working correctly without needing to understand what half of a traditional control panel’s icons even do.
Logging In and the Main Dashboard
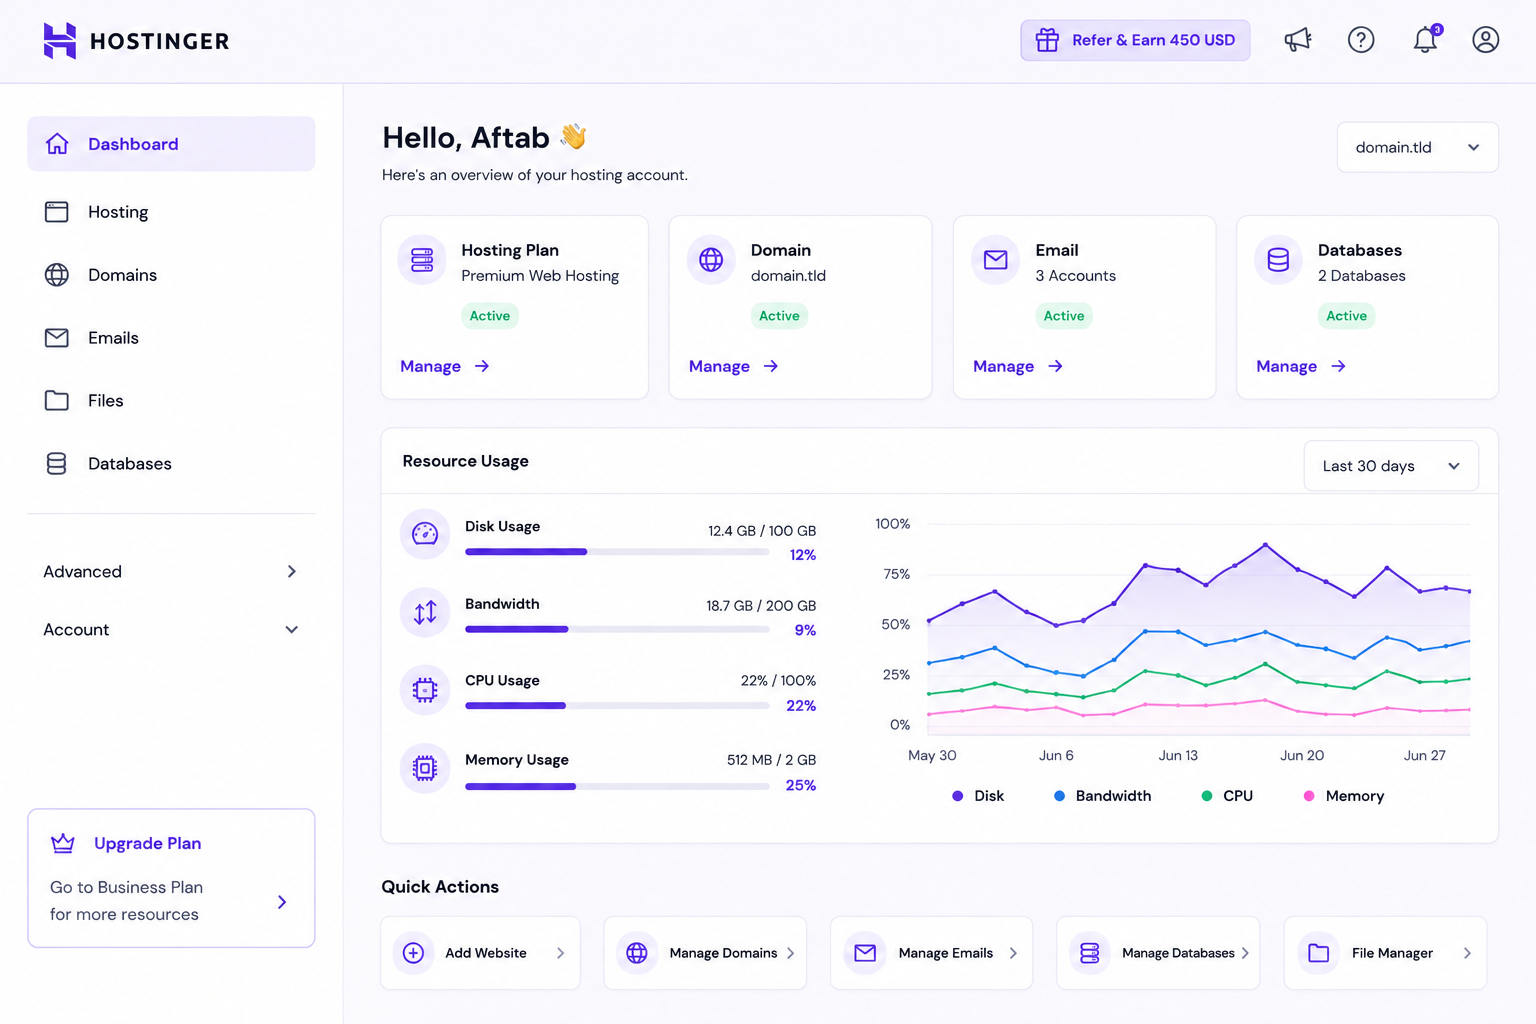
Once you’ve signed up for a Hostinger plan, you access hPanel by logging into your Hostinger account and clicking through from your account area. On first login, you land on a dashboard that gives you a quick overview of your active services, hosting plans, and domains, all in one place. This overview screen is intentionally simple, functioning as a starting point rather than a control center packed with settings.
From there, a left-hand sidebar menu gives you access to the panel’s main sections, typically organized around categories like Hosting, Domains, Emails, Files, Databases, and Security. Each of these sections expands into more specific tools once you click into it, but the top-level menu itself stays uncluttered, which is one of the more consistent points of praise hPanel receives compared to older-style panels.
The Hosting Section: Where You’ll Spend Most of Your Time
The Hosting tab is where the core of your website management happens. Inside it, you’ll find a Resource Usage section that displays real-time statistics for your CPU usage, memory (RAM) consumption, and inode usage, which is essentially a count of how many individual files and folders your account is using. Watching these numbers matters more than beginners often realize, since consistently high resource usage is usually the first sign that your site has outgrown your current plan, well before you’d notice any visible slowdown.
This section also houses your WordPress management tools if your site runs on WordPress, including one-click installation, a staging environment for testing changes safely before pushing them live, and update management for your WordPress core files, themes, and plugins.
Domains, Files, and Databases
The Domains section lets you manage everything related to your website’s address — connecting a domain you registered elsewhere, managing DNS records, and setting up subdomains if you need them. For most beginners running a single website, this section only needs attention once, during initial setup.
The Files section gives you access to your website’s actual file structure through a built-in file manager, letting you upload, edit, or delete files directly through the browser without needing separate FTP software, though FTP access is also available if you prefer using a dedicated client. The Databases section handles your MySQL databases, which is where structured content — like your WordPress posts, user accounts, and site settings — actually lives behind the scenes.
Setting Up Professional Email
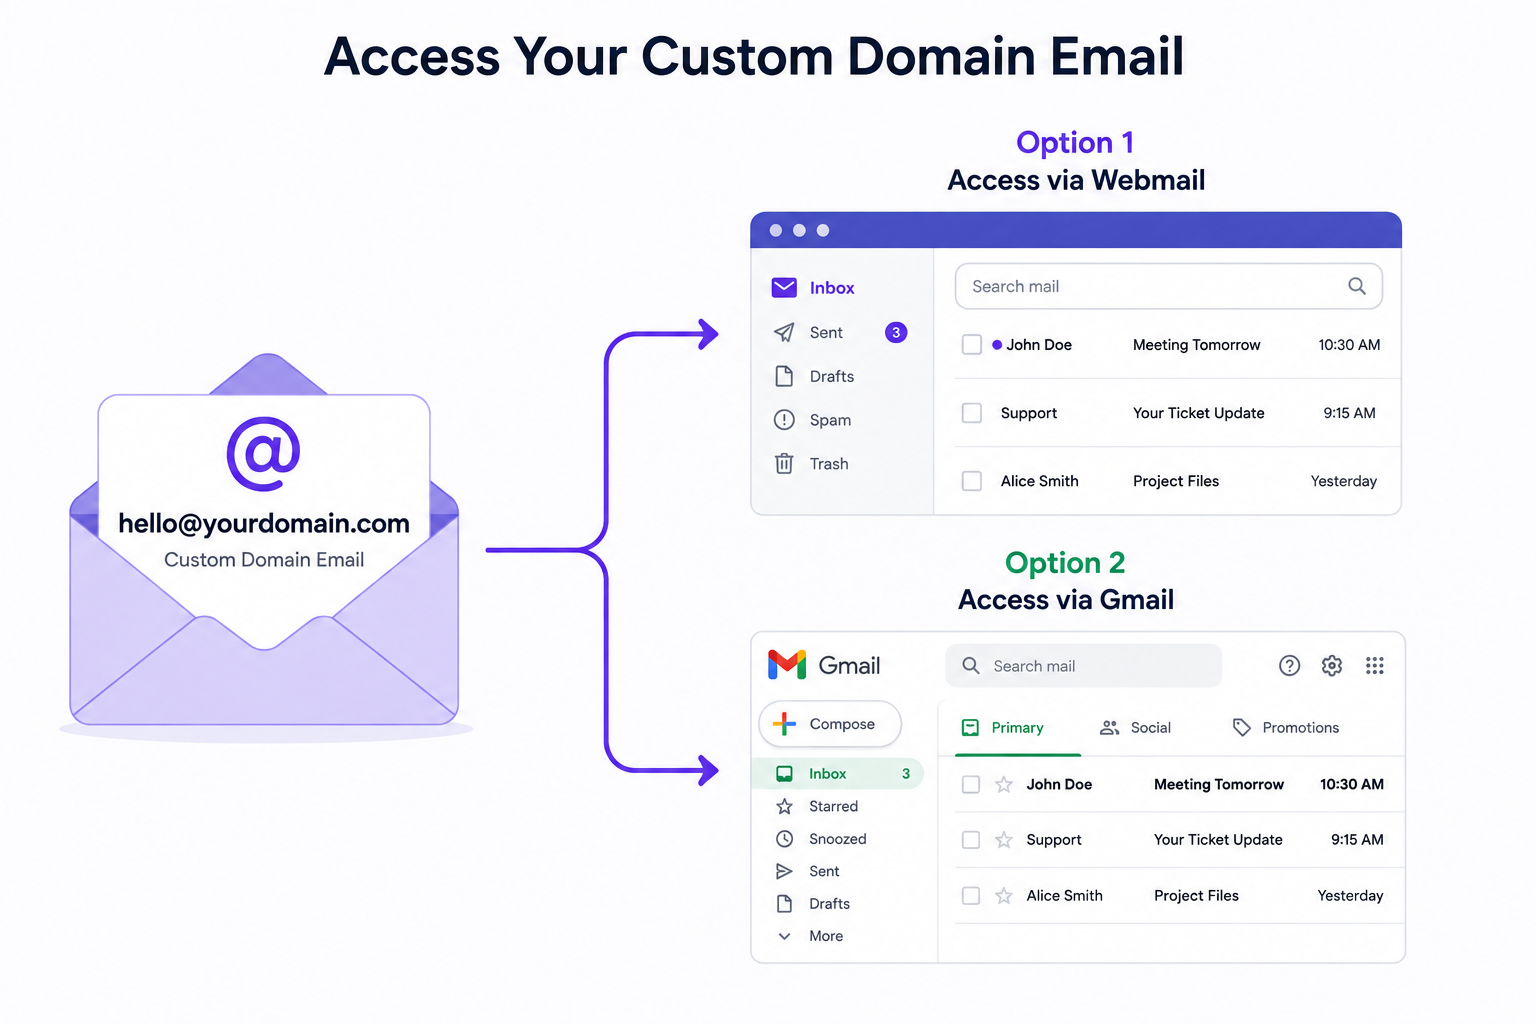
One detail beginners frequently miss is that most Hostinger plans include the ability to create professional email addresses using your own domain (like you@yourbusiness.com) directly through the Emails section of hPanel. All your email plans and mailboxes appear listed under their associated domain names, where you can toggle auto-renewal, adjust individual mailbox settings, or add new mailboxes as needed.
Once a mailbox is created, Hostinger provides a built-in webmail interface accessible with just your email address and password, which works well if you don’t want to configure anything further. Alternatively, you can connect your domain email to Gmail using IMAP or SMTP settings, letting you send and receive domain-based email through Gmail’s familiar interface instead of Hostinger’s built-in webmail.
Performance Tools: CDN, Caching, and Backups
hPanel’s Performance section is where you’ll find tools that directly affect how fast your website loads for visitors. Hostinger includes a built-in Content Delivery Network (CDN) that can be enabled directly from this section, which helps distribute your site’s static content across multiple server locations closer to your visitors, reducing load times for people accessing your site from different parts of the world.
Backups are handled through a dedicated dashboard as well, showing multiple restore points that typically span several weeks depending on your plan, giving you the ability to roll your entire site back to an earlier state if something goes wrong — a plugin update breaks your layout, for example, or a file gets accidentally deleted. For most beginners, this backup system ends up being one of the more genuinely reassuring features of the entire panel, since it removes a lot of the anxiety around making changes to a live website.
The AI Layer: Kodee and Horizons
The biggest change to hPanel over the past year has been how deeply artificial intelligence is now woven into the dashboard itself, rather than existing as a separate, optional add-on. Two tools matter most here:
Kodee is hPanel’s built-in AI assistant, capable of answering hosting-related questions and performing actual account tasks based on plain-English instructions rather than requiring you to navigate through menus manually. As of 2026, Kodee handles a very large volume of routine support conversations, often resolving common issues without needing to escalate to a human support agent at all.
Hostinger Horizons is a separate AI-powered app builder that goes beyond simple website creation, letting users describe what they want to build and generating a working starting point from that description. In early 2026, Hostinger added a planning agent to Horizons that breaks a build request into logical steps before generating anything, along with the ability to start a build inside a third-party AI chat tool and finish the process inside hPanel itself.
Underrated Features Worth Knowing About
A few hPanel tools sit quietly in the Advanced menus and get overlooked by most beginners, despite being genuinely useful:
- Git integration, which lets you connect a GitHub repository so that pushes to your main branch automatically deploy to your Hostinger site — a feature many other hosting providers reserve for higher-priced managed plans.
- Staging environments, included free on Business-tier plans and above, letting you safely test changes on a cloned copy of your live site before pushing anything to your actual visitors.
- Account sharing, which allows you to give a developer or virtual assistant scoped access to specific parts of your hosting account without ever sharing your actual login password.
hPanel vs. cPanel: The Short Version
If you’ve used cPanel before on another hosting provider, the adjustment to hPanel is generally described as quick, though not instant. cPanel exposes far more granular settings by default, which technical users sometimes miss, while hPanel intentionally simplifies the same functionality into fewer, more clearly labeled menus. Neither approach is objectively better in every situation — cPanel suits users who want maximum manual control, while hPanel suits users who want to get things done quickly without first learning what every setting actually does.
A Simple First-Week Checklist for New Users
- Log in and review your Resource Usage numbers so you have a baseline for what “normal” looks like on your plan.
- Connect or register your domain through the Domains section if you haven’t already.
- Set up at least one professional email address through the Emails section.
- Enable the built-in CDN under Performance if your audience is spread across multiple regions.
- Confirm your backup schedule is active and note how far back your restore points go.
- Try asking Kodee a basic hosting question just to get a feel for how the AI assistant responds before you actually need it in an emergency.
Frequently Asked Questions
Do I need any technical experience to use hPanel?
No. hPanel was specifically designed for users without server administration experience, with plain-language menus and guided workflows for most common tasks.
Is hPanel included with every Hostinger plan?
It’s included with all shared, cloud, and managed WordPress hosting plans. VPS plans use a different, more advanced set of server-management tools due to the added technical control VPS hosting requires.
Can I switch back to using FTP instead of the built-in file manager?
Yes. hPanel’s file manager is available for convenience, but standard FTP access is still supported for users who prefer managing files through a dedicated FTP client.
What happens if I accidentally break my website while making changes?
Your backup dashboard typically retains multiple restore points spanning several weeks, so in most cases you can roll your site back to a working state without needing outside technical help.
Final Thoughts
hPanel represents a genuinely different philosophy from the traditional cPanel most hosting tutorials are still built around, and for beginners specifically, that difference tends to work in their favor. Between the simplified navigation, built-in performance tools, and the growing layer of AI assistance through Kodee and Horizons, hPanel in 2026 functions less like a static settings page and more like an active, guided workspace for managing a website. Spending an hour clicking through each section before you actually need it is one of the more useful things a new Hostinger user can do in their first week.
This guide reflects hPanel’s features and layout as of August 2026. Interfaces and available tools are updated periodically, so specific menu locations may shift slightly over time — always check Hostinger’s official documentation for the most current walkthrough.
RELATED POSTS
View all

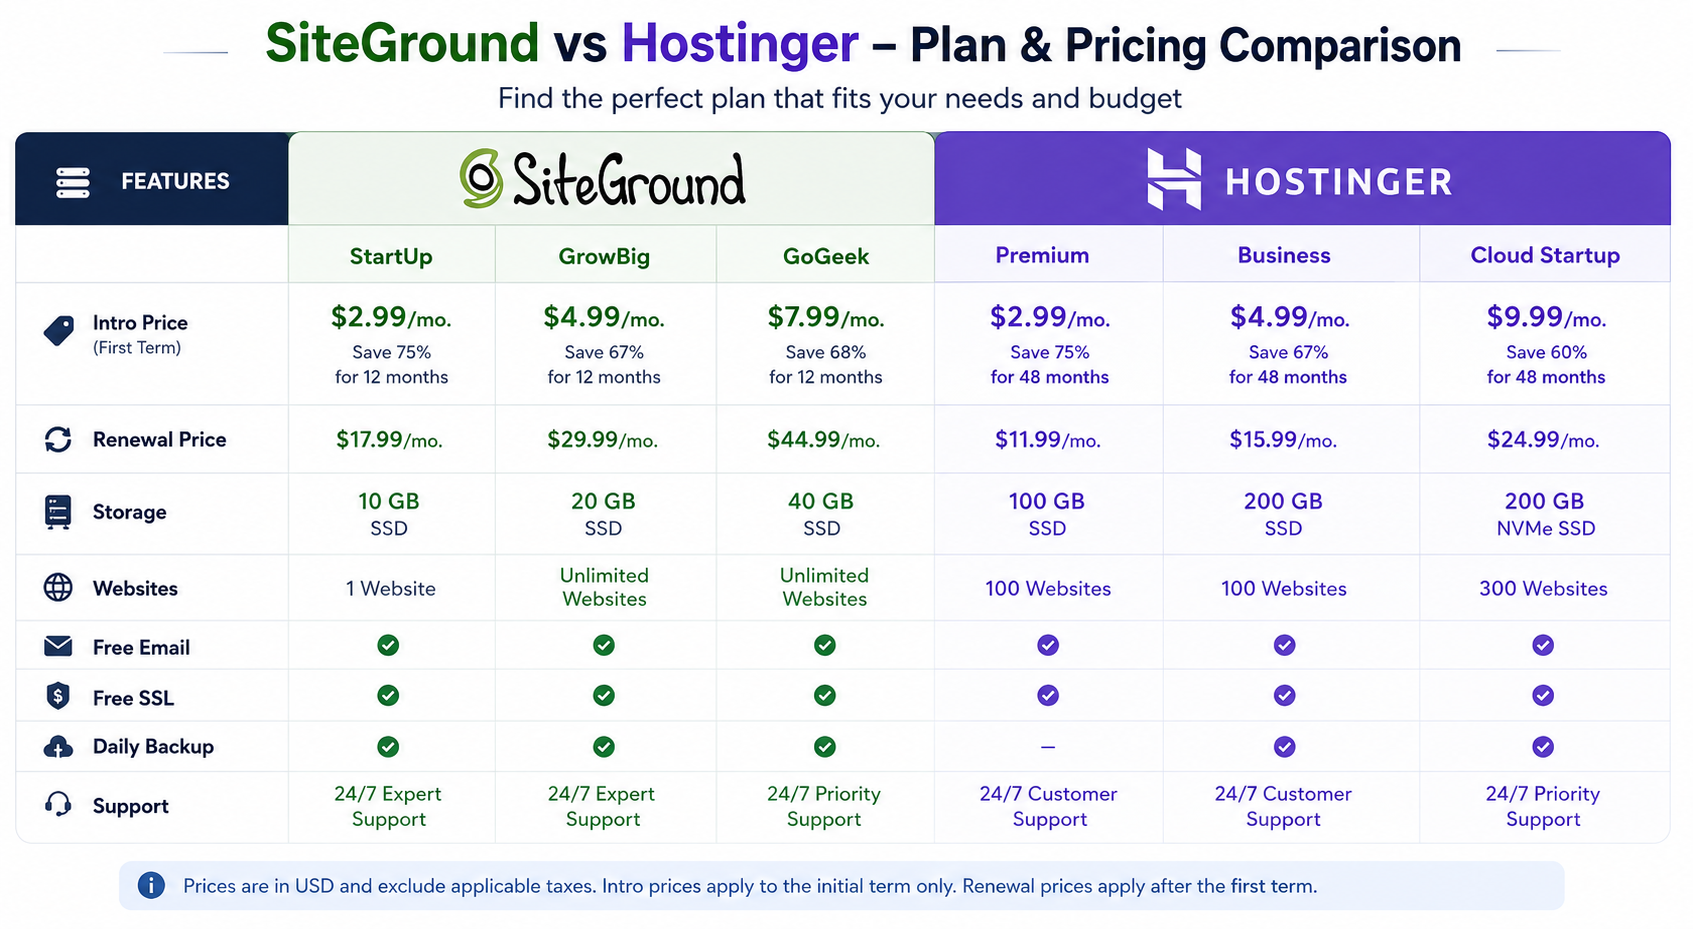
Hostinger vs SiteGround: Which Hosting Provider Is Better? (2026)
August 1, 2026 | by anisurrahaman235f@gmail.com
20 Things to Check Before Buying a Web Hosting Plan (2026)
August 2, 2026 | by anisurrahaman235f@gmail.com
Best Hosting for Small Business Websites in 2026
August 2, 2026 | by anisurrahaman235f@gmail.com